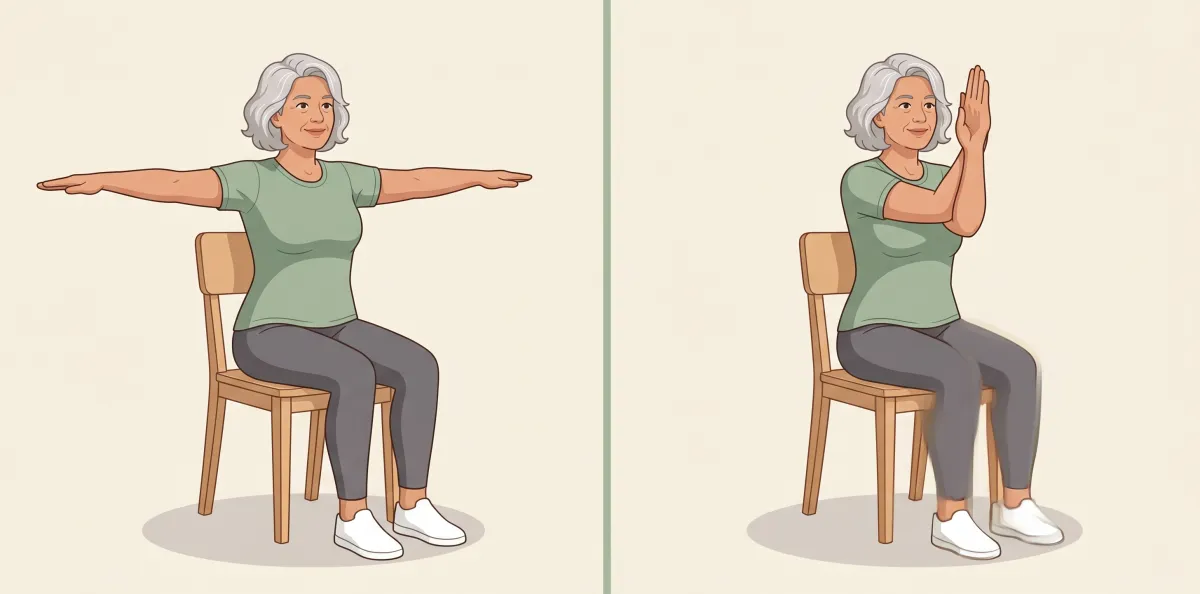
SeniorFit

Yoga for Seniors (Free Printable Chart)

Yoga for older adults uses gentle poses done with a chair for support — no floor work required. This free printable chart lists eight moves, from eagle arms and a seated side angle to a supported tree pose and mountain breath. Each exercise has large step-by-step text and a breathing cue. Move slowly, breathe steadily, and only stretch as far as is comfortable.

Position
Seated and standing
Equipment
A sturdy chair without wheels
Exercises
8

The exercises

Seated Eagle Arms: the starting position on the left and the finishing position on the right

Seated Eagle Arms

  1. Sit tall, feet flat on the floor.
  2. Cross your right arm over your left in front of you and entwine the forearms.
  3. Lift the elbows to shoulder height and hold, then switch arms.

Aim for: Hold 20 seconds each side · 2 times

Stretches the upper back and shoulders.

Seated Cow-Face Arms: the starting position on the left and the finishing position on the right

Seated Cow-Face Arms

  1. Sit tall and reach your right hand up and back behind your upper back.
  2. Reach your left hand down and up behind your lower back, fingertips moving toward each other.
  3. Hold gently, then switch arms.

Aim for: Hold 15 seconds each side · 2 times

Keeps the shoulders mobile for dressing and reaching.

Seated Side Angle: the starting position on the left and the finishing position on the right

Seated Side Angle

  1. Sit tall and rest your right forearm on your right thigh.
  2. Breathe in and reach your left arm up and over toward the right.
  3. Hold, then return and switch sides.

Aim for: Hold 3 breaths each side · 2 times

Stretches the side body and opens the chest.

Seated Heart Opener: the starting position on the left and the finishing position on the right

Seated Heart Opener

  1. Sit tall and place both hands on your low back.
  2. Breathe in and gently lift the chest into a soft arch.
  3. Hold for a breath, then return to sitting tall.

Aim for: Hold 3 breaths · 3 times

Opens the chest and eases a forward-bent posture.

Seated Figure-Four Stretch: the starting position on the left and the finishing position on the right

Seated Figure-Four Stretch

  1. Sit tall and cross your right ankle over your left knee.
  2. Breathe out and lean gently forward from the hips.
  3. Hold, then switch legs.

Aim for: Hold 20 seconds each side · 2 times

Stretches the outer hip and glute for easier sitting and walking.

Chair Warrior: the starting position on the left and the finishing position on the right

Chair Warrior

  1. Sit sideways on the chair and extend your right leg out to the side.
  2. Reach both arms wide at shoulder height, gaze forward.
  3. Hold, then turn around and repeat on the other side.

Aim for: Hold 5 breaths each side · 1 time

Opens the hips and builds a sense of steadiness.

Supported Tree Pose: the starting position on the left and the finishing position on the right

Supported Tree Pose

  1. Stand tall behind the chair, holding the back with both hands.
  2. Rest your right foot lightly on the side of your left calf.
  3. Hold steady, breathe, then switch feet.

Aim for: Hold 10 seconds each side · 2 times

Builds single-leg balance and calm focus.

Standing Mountain with Breath: the starting position on the left and the finishing position on the right

Standing Mountain with Breath

  1. Stand tall behind the chair, feet hip-width apart.
  2. Breathe in slowly and sweep both arms overhead.
  3. Breathe out and lower the arms. Repeat with a steady rhythm.

Aim for: 5 slow breaths

Centers the breath and encourages tall, easy posture.

Print this chart

A one-file PDF with all 8 exercises, large step-by-step text, set and rep counts, and a simple figure for each move. Prints clearly in black and white — tape it to the fridge and follow it each day.

Free · No signup · US Letter · 8 exercises

Check with your doctor before starting a new exercise routine, especially if you have a health condition or have not been active for a while. Move slowly and stop any exercise that causes pain.

Tips

  • Breathe slowly through your nose and never hold your breath in a pose.
  • Only stretch to a gentle, comfortable point — never into sharp discomfort.
  • Use a chair without wheels placed on a non-slip surface.
  • Print on plain white paper — the chart reads clearly in black and white.

Common questions

Do I need any yoga experience to follow this chart?
No experience is needed. Every pose on this chart is done seated or with a chair for support, and each one has simple step-by-step text. Just move slowly, breathe steadily, and only go as far as feels comfortable.
Is chair yoga the same as regular yoga?
Chair yoga uses many of the same movements as traditional yoga but adapts them so you can do them seated or with a chair nearby. That makes it accessible for anyone who finds getting up and down from the floor difficult.
How often should I do this yoga routine?
Moving through the chart three to five days a week is a good goal. Even a single round of ten to fifteen minutes leaves most people feeling looser and calmer. Consistency matters more than session length.